
If you already have your printing all set up and are looking to request an upgrade to your printing plan or submit another request for assistance, CLICK HERE TO SKIP TO THE REQUEST FORM.
Skip to pricing information here.
First Time Printer Set Up Start Here:
Follow THIS LINK to the Google Drive Folder and choose the folder called "Kyocera" 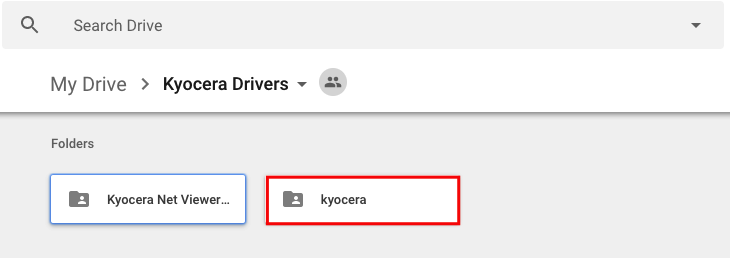
Choose either the Mac or PC folder depending on the type of computer you have. 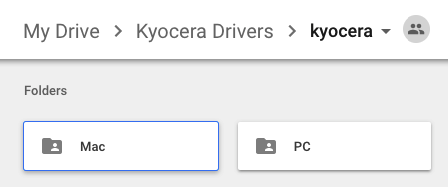
If you want the folder with individual files, choose the top one, but I recommend downloading the Zip folder 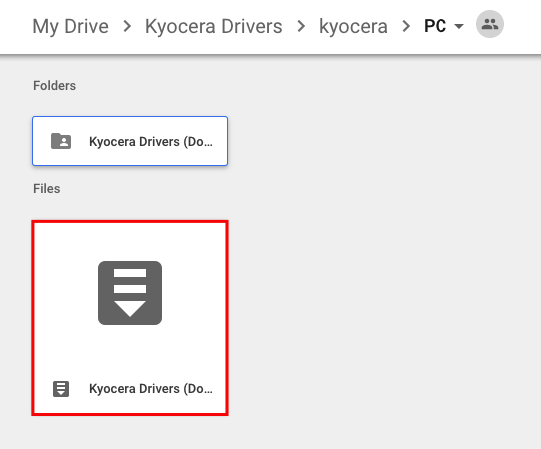
Find the Zip file on your computer and unzip it.
If you have a PC: open the Kyocera>en folder and run the setup.exe file then CLICK HERE TO SKIP TO THE SECTION FOR PC SET UP INSTRUCTIONS
If you have a Mac you don't need to install anything yet. IF YOU HAVE HIGH SEIRRA PLEASE LET DALLAS KNOW (because you will need a special printer code)
IF YOU HAVE A MAC, FOLLOW THESE STEPS:
Open a document or a webpage, anything you can print and select "change" printer desintaion 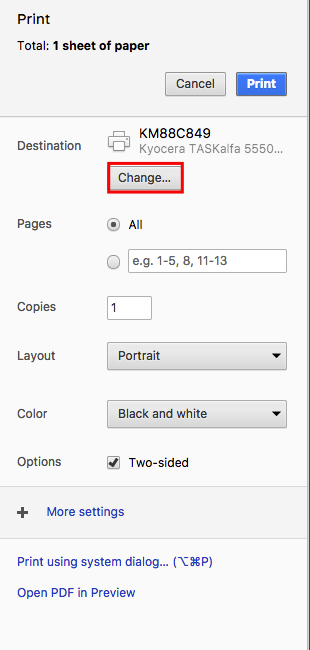
If you don't se the printer "KM88C849" come up, choose the option to "Mange" local destinations 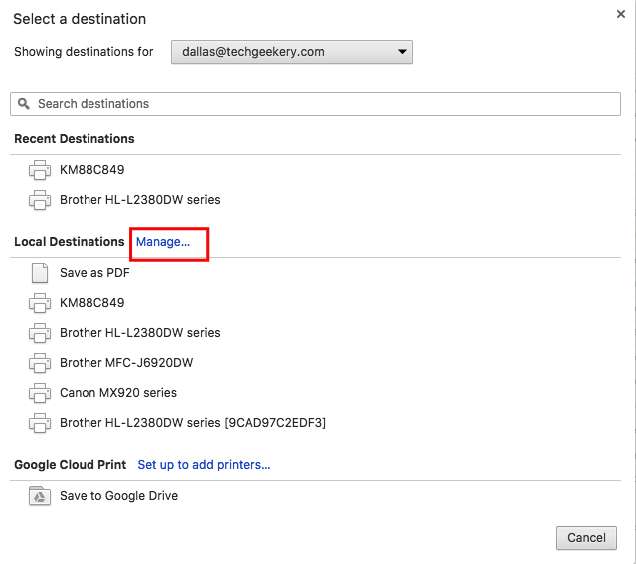
Click the "+" symbol to add a new printer 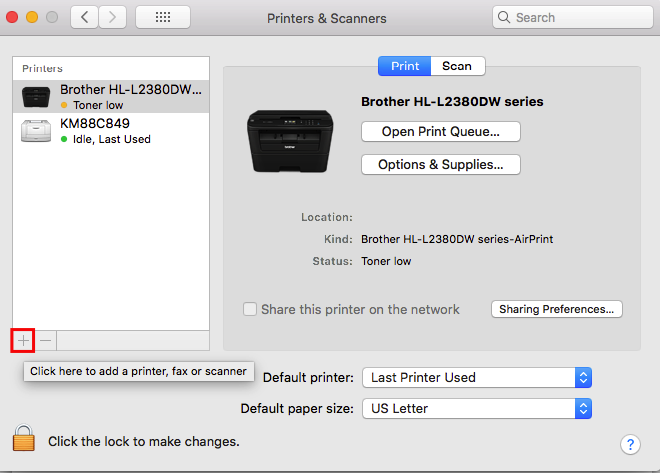
(if it is greyed out you may need to click the lockpad and put in your admin password)
Choose KM88C849 and click "Add" 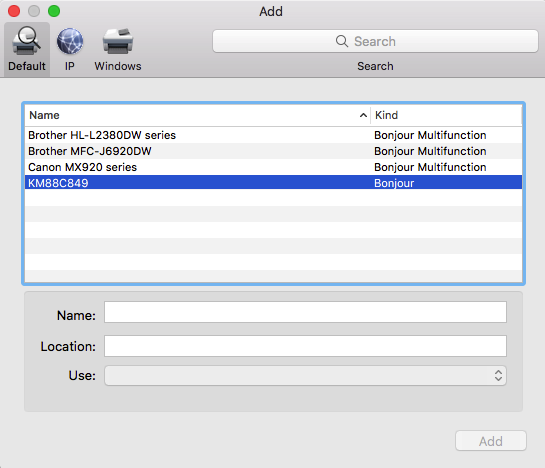
At some point this screen will pop up (I don't quite remember if it is at this point in the process, but somewhere around now) and you'll want to indicate the following information: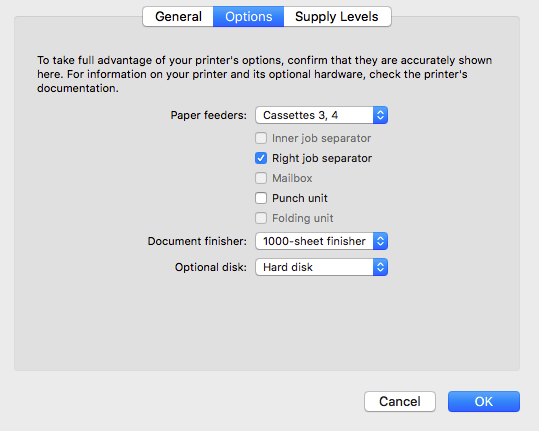
Back on this menu, with KM88 selected above, you'll want to choose "Print Using System Dialog" 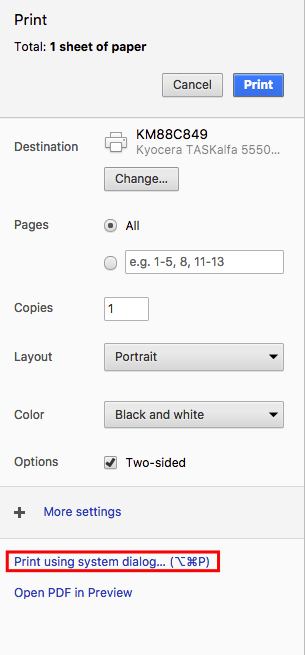
Click the dropdown menu that starts out on "Layout" by default ,and choose "Print Panel" 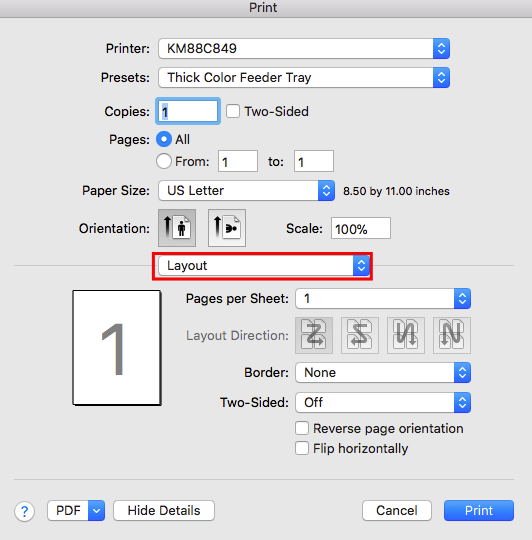
Once on the Print Panel section, choose "Settings" 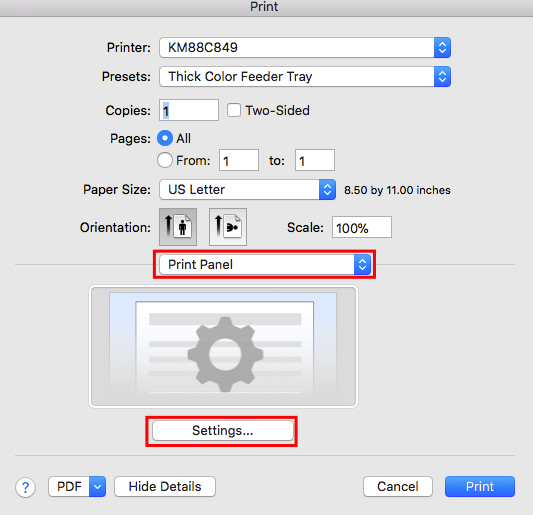
Set the Source to "autoselect", you can leave "paper type" to whatever it has for the default (may show as "Plain" or "None Selected", doesn't matter), you'll want to select the middle "Duplex: Long Edge" option and "Black & White" for the Color setting (Click through the other tabs on the left to check out all the other cool options you now have for printing).
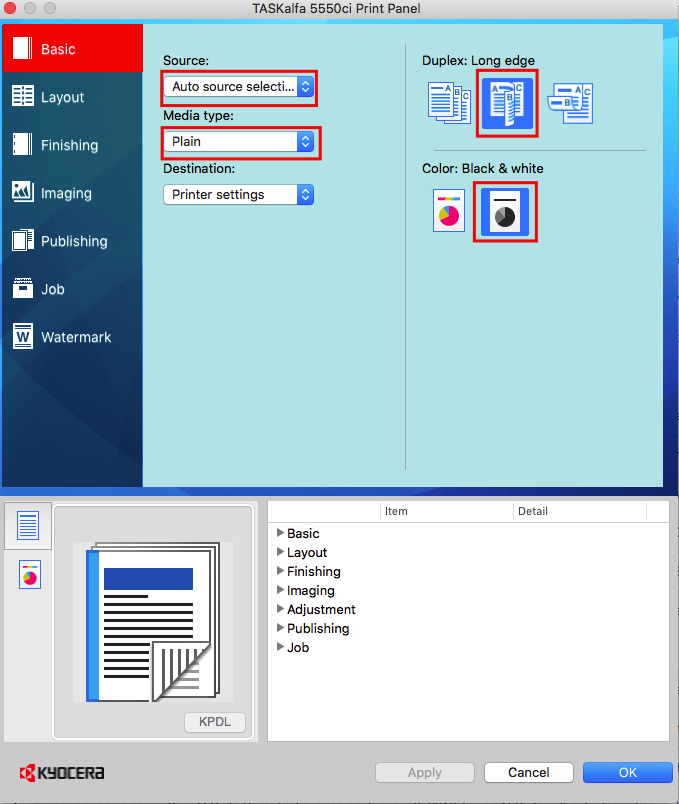
On the "Job" tab, check the box for "Job Accounting" and then type your code in the box, then hit "ok". 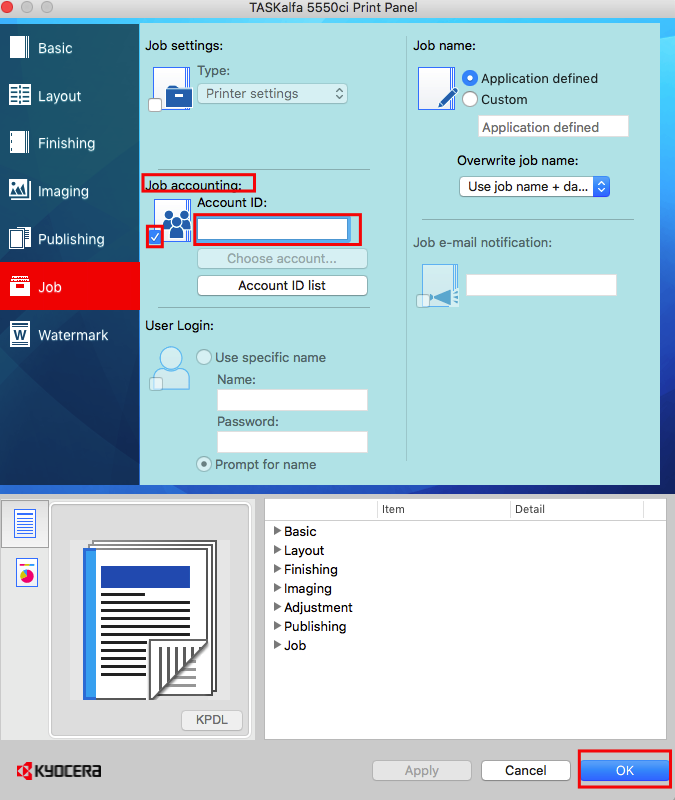
And finally! Back on this screen, from the dropdown choose "Save Current Settings as Preset..."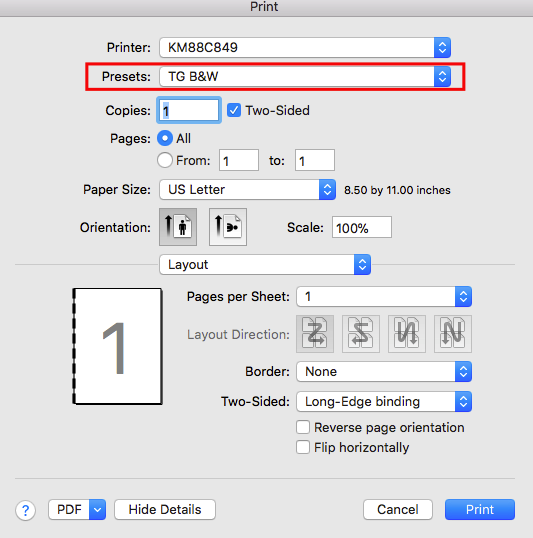
Now you'll have the ability to name your settings (if you followed the steps exactly, you'll probably want to name it something like "B&W Duplex"
In the future if you find you are doing jobs that require other types of settings on a regular basis you might want to save other options as presets such as "B&W Mailing" (where the settings are such that it knows to pull an envelope from the back feeder tray) or "Color Poster" where it knows it is going to pull 11x17 paper and print in color, etc.
If you have a PC:
Unzip the folder to anywhere you like on your computer, open the "PC" folder and then the "EN" folder and find the setup.exe file and run that.
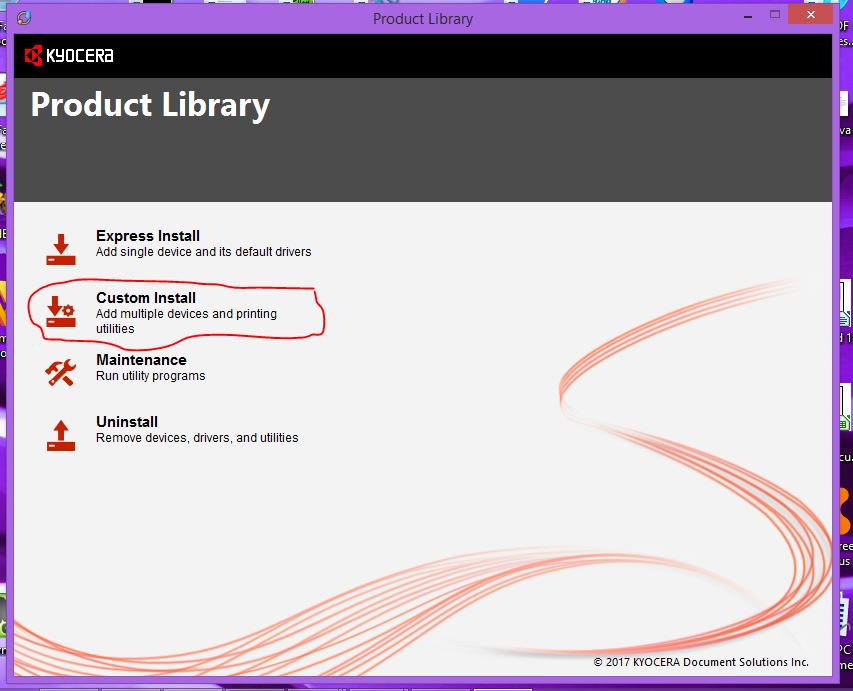
When you get to this window, select "Custom Install"
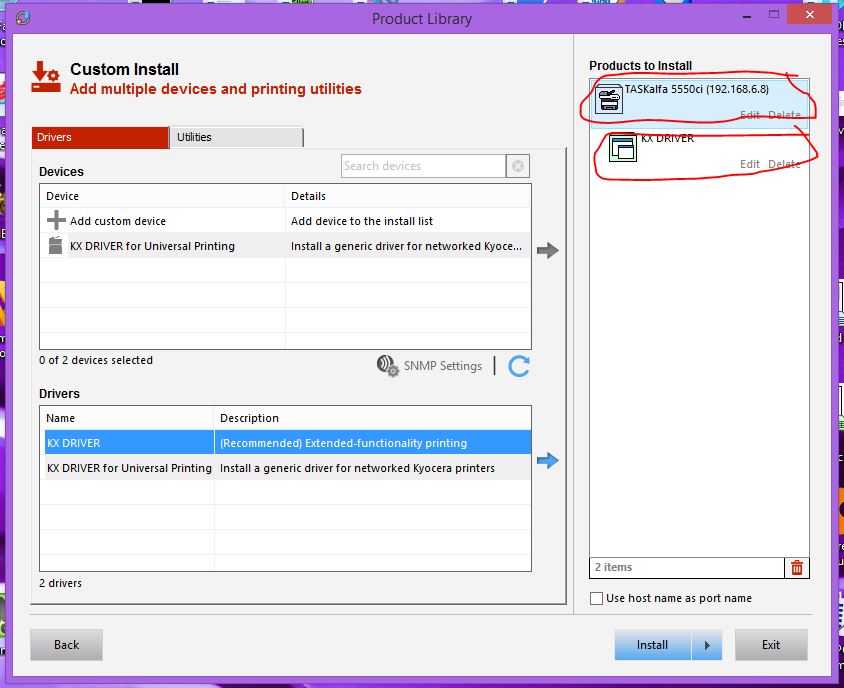
In the Custom Install page, select TASKalfa 5550ci with the IP address in the "Details" window and then click the top arrow on the right.
Then choose the "KX Driver (Recomended) Extended Functionality Printing" then click the bottom arrow on the right.
Then choose "Install"
There will be various things to click "next" on, and the option to let them collect data about errors (choose yes or no, doesn't matter), and finally "finish"
Once you've finished installing the printer with the steps aove, open your Control Panel and then open "printers and devices" (it may have a slightly different name depending on your version of Windows):

Double click on Kyocera TASKalfa 5550ci KX

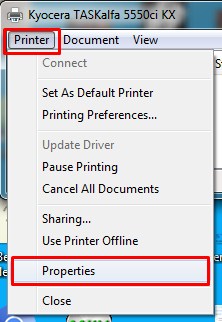
When the Printer's info box opens up click on "Printer" in the top left, then click on "Properties"
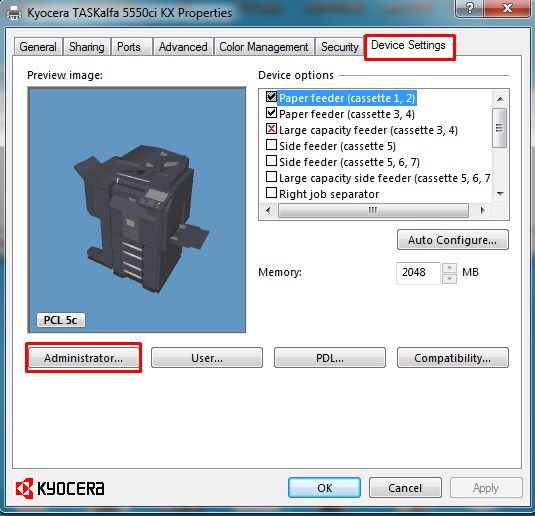
Now click on the "Dvice Settings" tab and choose "Administrator"
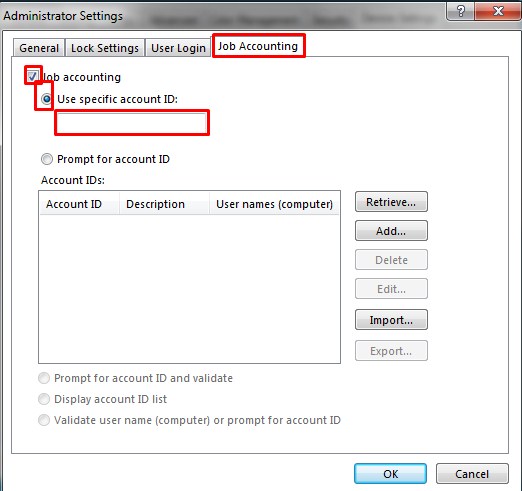
On the Administrator window, choose the "Job Accounting" tab, check the box next to "Job Accounting" and then the radio button next to "Use specific account ID" and enter your personal ID in this box.
(Note: if you have multiple users on the same computer with different codes or you work for multiple companies and each has their own code, you'll want to choose "Prompt for account ID" instead.
Click "OK" and you're all set.
It is strongly recommended that you change your color defaults to black and white (the driver's default is 'color' and color is restricted unless you're paying for access to color printing - also, even if you're paying for color printing you're going to want to make sure you don't burn through all your color!)
Need more Black & White Prints or want to print in Color?
| Included in Membership | 50 EXTRA Black & White and 25 pages of color each month | 100 Extra Black & White each month (no roll over) | 50 Pages of Color Printing each month (no roll over) |
Pre-Paid Black & White (10 page minimum, do not expire) |
Pre-Paid Color |
|
| Day Pass | 10 Black & White | N/A | N/A | N/A | $0.20/page | $1.00/page |
| CommonSpace Resident | 20 Black & White | $8/mo | $5/mo | $10/mo | $0.15/page | $0.80/page |
| Basic Membership | 30 Black & White | $8/mo | $5/mo | $10/mo | $0.10/page | $0.75/page |
| Standard Membership | 35 Black & White | $8/mo | $5/mo | $10/mo | $0.10/page | $0.75/page |
| Resident Membership | 40 Black & White | $8/mo | $5/mo | $10/mo | $0.05/page | $0.50/page |
| Office | 50 Black & White | $8/mo | $5/mo | $10/mo | $0.05/page | $0.50/page |
Other local printing options (prices assume 8.5x11 standard paper in quantities of less than 50):
| Campus Copy | FedEx | Staples | |
| B&W | $0.20 | $0.15 | $0.085 |
| Color | 1.69 | $0.75 | $0.42 |
Need help getting your printer code? Want to buy extra printing credits? Use this form!